Here's a great tip to speed up your browsing of Windows XP machines. Its actually a fix to a bug installed as default in Windows that scans shared files for Scheduled Tasks. And it turns out that you can experience a delay as long as 30 seconds when you try to view shared files across a network because Windows is using the extra time to search the remote computer for any Scheduled Tasks. The actual browsing speed of both the Internet & Windows Explorers improve significantly after applying it since it doesn't search for Scheduled Tasks anymore. Here's how :
Open up the Registry and go to :
HKEY_LOCAL_MACHINE/Software/Microsoft/Windows/Current Version/Explorer/RemoteComputer/NameSpace
Under that branch, select the key :
{D6277990-4C6A-11CF-8D87-00AA0060F5BF}
and delete it.
This fix is so effective that it doesn't require a reboot and you can almost immediately determine yourself how much it speeds up your browsing processes.
Read more...
Sunday, June 22, 2008
Stop Error Reporting in XP!!!
If error reporting in XP is bugging you then turn it off.
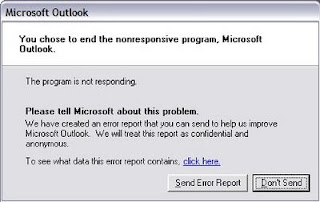
When a system error occurs in XP, a little dialog box appears asking if you want to report the error to Microsoft. Click the message box to make it disappear. You don't have to report the error if you don't want to and on today's "Call for Help" Leo shows you how to turn off the feature if you find it distracting.
To disable error reporting, follow these directions:
1. Right-click My Computer and choose Properties.
2. Click the Advanced tab on your System Properties dialog box.
3. Click the Error Reporting button on the Advanced tab.
4. Place a checkmark next to "Disable error reporting."
5. Leave the other radio button unchecked next to the text labeled, "But notify me when critical errors occur."
6. Click OK.
Read more...
Thursday, June 12, 2008
How Windows XP System Properties logo change!!!
Hi friends,today I want to tell you about a hidden tricks in Windows XP.Please read this -
The Windows XP System Properties logo is often changed by computer manufacturers. Hardware vendors use this general system information dialog to brand your computer with their own logo and support contact information.
In this tip you can learn how you can insert your own logo in the system properties dialog and complete it with your own contact information.
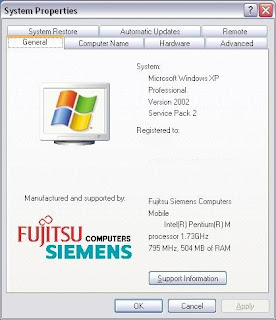
To invoke the system properties dialog, click the Start button, right-click "My Computer" and select "Properties".
This will open up your general system information dialog. On our Fujitsu-Siemens Amilo Pro laptop, the Windows XP System Properties logo looks like this :
If you want to put your own graphic in there, you should create your image in a .bmp graphic file. It's also a good idea to create this bitmap image with the same background shade of gray (RGB: 192, 192, 192) used in the Properties dialog. Otherwise, you risk letting Windows make its own judgments regarding color contrast and background shading.
The next thing to consider is the image size. The system properties dialog only offers enough real estate for an image of about 180 (wide) x120 (high) pixels. Make sure that you can fit your logo in this area.
Once you have created your logo and saved it as a .bmp file, copy it over to the system32 subfolder of your Windows system folder. If you don't know where your system folder is :
* Click the Start button and select "Run"
* In the "open" field, enter "cmd" (without the quotes) and click ok
* Windows will open up a dos command window
* In the command window, type "set system" (without the quotes)
* Look for the line that contains "SystemRoot", this is where your system directory is (generally, the Windows XP system folder is c:\windows)
Now that you know where your system folder is, copy your logo image file over to the system32 subfolder of your system folder. Then rename your logo image file to oemlogo.bmp
Additionally you can create a new file in this same folder and name the new file oeminfo.ini
In this file you can enter your contact information like in the example below :
[General]
Manufacturer=Windows Help Central
Model=ShowCase
[Support Information]
Line1=" "
Line2=" For support, sales, upgrades or questions:"
Line3=""
Line4=" Some text to demonstrate the XP System Properties logo"
Line5=" Windows XP Tips and Tricks "
Line6=" yadayada"
Line7=""
Line8=" +1 (888) 888-888 (voice)"
Line9=" +1 (888) 888-889 (fax)"
Line10=""
Line11=""
Line12=" http://www.windows-help-central.com/"
Save and close the file and you are ready. From now on, if someone opens up the system properties dialog, your own Windows XP System Properties logo is in there.
Read more...
The Windows XP System Properties logo is often changed by computer manufacturers. Hardware vendors use this general system information dialog to brand your computer with their own logo and support contact information.
In this tip you can learn how you can insert your own logo in the system properties dialog and complete it with your own contact information.
To invoke the system properties dialog, click the Start button, right-click "My Computer" and select "Properties".
This will open up your general system information dialog. On our Fujitsu-Siemens Amilo Pro laptop, the Windows XP System Properties logo looks like this :
If you want to put your own graphic in there, you should create your image in a .bmp graphic file. It's also a good idea to create this bitmap image with the same background shade of gray (RGB: 192, 192, 192) used in the Properties dialog. Otherwise, you risk letting Windows make its own judgments regarding color contrast and background shading.
The next thing to consider is the image size. The system properties dialog only offers enough real estate for an image of about 180 (wide) x120 (high) pixels. Make sure that you can fit your logo in this area.
Once you have created your logo and saved it as a .bmp file, copy it over to the system32 subfolder of your Windows system folder. If you don't know where your system folder is :
* Click the Start button and select "Run"
* In the "open" field, enter "cmd" (without the quotes) and click ok
* Windows will open up a dos command window
* In the command window, type "set system" (without the quotes)
* Look for the line that contains "SystemRoot", this is where your system directory is (generally, the Windows XP system folder is c:\windows)
Now that you know where your system folder is, copy your logo image file over to the system32 subfolder of your system folder. Then rename your logo image file to oemlogo.bmp
Additionally you can create a new file in this same folder and name the new file oeminfo.ini
In this file you can enter your contact information like in the example below :
[General]
Manufacturer=Windows Help Central
Model=ShowCase
[Support Information]
Line1=" "
Line2=" For support, sales, upgrades or questions:"
Line3=""
Line4=" Some text to demonstrate the XP System Properties logo"
Line5=" Windows XP Tips and Tricks "
Line6=" yadayada"
Line7=""
Line8=" +1 (888) 888-888 (voice)"
Line9=" +1 (888) 888-889 (fax)"
Line10=""
Line11=""
Line12=" http://www.windows-help-central.com/"
Save and close the file and you are ready. From now on, if someone opens up the system properties dialog, your own Windows XP System Properties logo is in there.
Read more...
Friday, June 6, 2008
Top 20 Tips About Windows XP(part2)
20 things you need to know about Windows XP(part 2)!!!
11. You can run a program as a different user without logging out and back in again. Right click the icon, select Run As... and enter the user name and password you want to use. This only applies for that run. The trick is particularly useful if you need to have administrative permissions to install a program, which many require. Note that you can have some fun by running programs multiple times on the same system as different users, but this can have unforeseen effects.12. Windows XP can be very insistent about you checking for auto updates, registering a Passport, using Windows Messenger and so on. After a while, the nagging goes away, but if you feel you might slip the bonds of sanity before that point, run Regedit, go to HKEY_CURRENT_USER/Software/Microsoft/Windows/Current Version/Explorer/Advanced and create a DWORD value called EnableBalloonTips with a value of 0.
13. You can start up without needing to enter a user name or password. Select Run... from the start menu and type 'control userpasswords2', which will open the user accounts application. On the Users tab, clear the box for Users Must Enter A User Name And Password To Use This Computer, and click on OK. An Automatically Log On dialog box will appear; enter the user name and password for the account you want to use.
14. Internet Explorer 6 will automatically delete temporary files, but only if you tell it to. Start the browser, select Tools / Internet Options... and Advanced, go down to the Security area and check the box to Empty Temporary Internet Files folder when browser is closed.
15. XP comes with a free Network Activity Light, just in case you can't see the LEDs twinkle on your network card. Right click on My Network Places on the desktop, then select Properties. Right click on the description for your LAN or dial-up connection, select Properties, then check the Show icon in notification area when connected box. You'll now see a tiny network icon on the right of your task bar that glimmers nicely during network traffic.
16. The Start Menu can be leisurely when it decides to appear, but you can speed things along by changing the registry entry HKEY_CURRENT_USER/Control Panel/Desktop/MenuShowDelay from the default 400 to something a little snappier. Like 0.
17. You can rename loads of files at once in Windows Explorer. Highlight a set of files in a window, then right click on one and rename it. All the other files will be renamed to that name, with individual numbers in brackets to distinguish them. Also, in a folder you can arrange icons in alphabetised groups by View, Arrange Icon By... Show In Groups.
18. Windows Media Player will display the cover art for albums as it plays the tracks -- if it found the picture on the Internet when you copied the tracks from the CD. If it didn't, or if you have lots of pre-WMP music files, you can put your own copy of the cover art in the same directory as the tracks. Just call it folder.jpg and Windows Media Player will pick it up and display it.
19. Windows key + Break brings up the System Properties dialogue box; Windows key + D brings up the desktop; Windows key + Tab moves through the taskbar buttons.
20. How do I enable advanced security settings like found in Windows 2000?
Open windows explorer then click on Tools->Folder Options
Click on the View Tab.
Scroll to the bottom and deselect (uncheck) the option that reads 'use simple file sharing'
This will allow you to see the security tab when viewing the properties of a file/folder.
Read more...
Wednesday, June 4, 2008
Top 20 Tips About Windows XP!!!
20 things you need to know about Windows XP!!!
Now it's time to uncover some of Windows XP's secrets...1. It boasts how long it can stay up. Whereas previous versions of Windows were coy about how long they went between boots, XP is positively proud of its stamina. Go to the Command Prompt in the Accessories menu from the All Programs start button option, and then type 'systeminfo'. The computer will produce a lot of useful info, including the uptime. If you want to keep these, type 'systeminfo > info.txt'. This creates a file called info.txt you can look at later with Notepad. (Professional Edition only).
2. You can delete files immediately, without having them move to the Recycle Bin first. Go to the Start menu, select Run... and type 'gpedit.msc'; then select User Configuration, Administrative Templates, Windows Components, Windows Explorer and find the Do not move deleted files to the Recycle Bin setting. Set it. Poking around in gpedit will reveal a great many interface and system options, but take care -- some may stop your computer behaving as you wish. (Professional Edition only).
3. You can lock your XP workstation with two clicks of the mouse. Create a new shortcut on your desktop using a right mouse click, and enter 'rundll32.exe user32.dll,LockWorkStation' in the location field. Give the shortcut a name you like. That's it -- just double click on it and your computer will be locked. And if that's not easy enough, Windows key + L will do the same.
4. XP hides some system software you might want to remove, such as Windows Messenger, but you can tickle it and make it disgorge everything. Using Notepad or Edit, edit the text file /windows/inf/sysoc.inf, search for the word 'hide' and remove it. You can then go to the Add or Remove Programs in the Control Panel, select Add/Remove Windows Components and there will be your prey, exposed and vulnerable.
5. For those skilled in the art of DOS batch files, XP has a number of interesting new commands. These include 'eventcreate' and 'eventtriggers' for creating and watching system events, 'typeperf' for monitoring performance of various subsystems, and 'schtasks' for handling scheduled tasks. As usual, typing the command name followed by /? will give a list of options -- they're all far too baroque to go into here.
6. XP has IP version 6 support -- the next generation of IP. Unfortunately this is more than your ISP has, so you can only experiment with this on your LAN. Type 'ipv6 install' into Run... (it's OK, it won't ruin your existing network setup) and then 'ipv6 /?' at the command line to find out more. If you don't know what IPv6 is, don't worry and don't bother.
7. You can at last get rid of tasks on the computer from the command line by using 'taskkill /pid' and the task number, or just 'tskill' and the process number. Find that out by typing 'tasklist', which will also tell you a lot about what's going on in your system.
8. XP will treat Zip files like folders, which is nice if you've got a fast machine. On slower machines, you can make XP leave zip files well alone by typing 'regsvr32 /u zipfldr.dll' at the command line. If you change your mind later, you can put things back as they were by typing 'regsvr32 zipfldr.dll'.
9. XP has ClearType -- Microsoft's anti-aliasing font display technology -- but doesn't have it enabled by default. It's well worth trying, especially if you were there for DOS and all those years of staring at a screen have given you the eyes of an astigmatic bat. To enable ClearType, right click on the desktop, select Properties, Appearance, Effects, select ClearType from the second drop-down menu and enable the selection. Expect best results on laptop displays. If you want to use ClearType on the Welcome login screen as well, set the registry entry HKEY_USERS/.DEFAULT/Control Panel/Desktop/FontSmoothingType to 2.
10. You can use Remote Assistance to help a friend who's using network address translation (NAT) on a home network, but not automatically. Get your pal to email you a Remote Assistance invitation and edit the file. Under the RCTICKET attribute will be a NAT IP address, like 192.168.1.10. Replace this with your chum's real IP address -- they can find this out by going to www.whatismyip.com -- and get them to make sure that they've got port 3389 open on their firewall and forwarded to the errant computer.
To be Continued........
Read more...
Tuesday, June 3, 2008
Convert FAT to NTFS file system!!!
How to Convert FAT to NTFS file system
To convert a FAT partition to NTFS, perform the following steps. Click Start, click Programs, and then click Command Prompt.
In Windows XP, click Start, click Run, type cmd and then click OK.
At the command prompt, type CONVERT [driveletter]: /FS:NTFS.
Convert.exe will attempt to convert the partition to NTFS.
NOTE: Although the chance of corruption or data loss during the conversion from FAT to NTFS is minimal, it is best to perform a full backup of the data on the drive that it is to be converted prior to executing the convert command. It is also recommended to verify the integrity of the backup before proceeding, as well as to run RDISK and update the emergency repair disk (ERD).
Read more...
Monday, June 2, 2008
Change Recycle Bin's Name!!!
Hi Dost, welcome to my world. Here I give you some interesting Tips & Tricks for your computer. Here you can find secret & hidden tips or tricks for your computer. If you want to know something please give your comment with your e-mail id or give a mail- jony08@gmail.com
Read more...
Change The Recycle Bin's Name
Have you ever wanted to rename the Recycle Bin to something different? Let's say you want to rename it to "Trash." You can change the name if you wish--but it requires a Registry edit. To make it easy to change the Recycle Bin's name to Trash, we wrote a REG file you can use. Note that we can't guarantee this REG file, or any REG file, will do what you expect. Nor can we promise that no damage will result from its use. To create the REG file, run Notepad and enter the following exactly as shown. When you encounter BLANK LINE GOES HERE, press Enter to insert a blank line.
REGEDIT4 BLANK LINE GOES HERE [HKEY_CLASSES_ROOT\CLSID\
{645FF040-5081-101B-9F08-00AA002F954E}] @="Trash" BLANK LINE GOES HERE
Now choose File, Save As and name the new file Trash.reg. Locate a folder for the file and click Save. To name your Recycle Bin Trash, double-click the Trash.reg file's icon and click OK in the dialog box that appears. When the computer restarts, the Recycle Bin is named Trash. Note that other references are still to the Recycle Bin. When you right-click the Trash icon, you still get the option Empty Recycle Bin.
Read more...
Subscribe to:
Comments (Atom)

